
Installation & Setup
- Attach the antenna to the SMA connector and connect power via the USB-C cable on your WiMBIB.
- Search for the Wi-Fi SSID called “WIMBIB_<mac>” with your mobile device or laptop. Connect to it.
- Open your webbrowser and go to url http://192.168.1.1 or http://wimbib.local (if your device supports mDNS/avahi/bonjour). Note: On older phones it might be needed to disable “mobile data”, due to the phone doesn’t understand where to route the data (over wifi or cellular network)
- Go to the settings page, press button “Scan”.
- Select your Wi-Fi access point SSID and fill in the password.
- Set a login protection password – for your safety!
- If you have received a .kem file from your watermeter provider, press the button “Open KEM file”. Select your file and press OK. Note.*
- …or if you have received your encryption key in free text instead of a KEM file (should be in hexadecimal format, 0011AAFF…format). Then enter the key in the key field. The serial field is the serial number that is on the label of your watermeter. **
- Then click the button “Save & Restart”.
- Reconnect to your home network/access point on your mobile device/laptop.
- Go to your webbrowser, enter url https://wimbib.local or the IP presented on the WiMBIB display.
- Now you have to wait for WiMBIB to receive data from your watermeter (read chapter ‘How does it work’ below).
- Done!
* The KEM-file can come in different formats. One is a clean .kem file, sometimes its named *.zip.kem and sometimes its a *.zip file.
If its an *.zip.kem file, just rename it to .zip and unzip it. Inside resides two files, where one is the actual .kem file which you load into your WiMBIB.
** Note. For Diehl Hydrus 2.0 meters; The meters serial number is the last 8 digits. Remove the rest.
Home Assistant & MQTT
WiMBIB communicates to other software/services via MQTT. MQTT is a communication protocol for internet of things devices.
- Install an MQTT broker of your choice (via HACS, Mosquitto via docker container or as standalone application)
- Go to WiMBIB settings -> MQTT. Enable it. Add IP/hostname and possible username/password if authentication is used by your broker.
- Click button “Save & Restart”
- Verify that MQTT state is “connected”.
- Go to home assistant -> Settings -> Devices & services. Click the tab “Devices”. Scroll down until you find WiMBIB. Click on it. NOTE. WiMBIB must first receive a wireless m-bus full frame before it can determine which sensors that shall be registered into your home assistant.
- If everything works as expected, you should now see all entities available for you in Home Assistant.
- Click Home assistant -> Settings -> Dashboards -> Energy.
- In the box “Water consumption”. Press button “Add water source”. Select your WiMBIB volume sensor.
- Done!
How does it work?
The watermeter sends data continously (at intervalls) over a radio protocol named Wirelss M-Bus. Normally Kamstrup meters send a chunk (frame) of radio information each 90seconds.
– “By running a WiMBIB, does it draw more battery of my water meter?”. The answer is no. The data is transmitted from your watermeter regardless if your WiMBIB is picking it up. WiMBIB does not transmit any data over Wirelss M-Bus. It only listens and decodes data that is sent over the air.
– “Why does it take so long time until I receive any information after restart?”. The reason is in the way Wireless M-Bus works. The watermeters sends (in the case of watermeters, can be different on other devices) two different types of radio frames. One is called ‘full frame’, the other ‘compact frame’. A full frame contains information on what kind of data type that is transmitted, the format of the data, for instance temperature, volume, alarms data and lots of other metadata. Compact frames only transmit actual values. For the WiMBIB to understand how to process the compact frames, it needs to receive at least one full frame before.
Full frames are only transmitted once normally per eight frames*. But it can differ, and also if its weekend or during different hours of the day. The other frames between full frames are compact frames.
Normally it might take ~10-20 minutes before a full frame is transmitted and WiMBIB receives it. Until then, it will show “waiting” on the OLED display with a CF-counter (compact frame).
After the full frame is received, WiMBIB will decode each radio frame (per 90 seconds) received.
* Can be different on different watermeters. Kamstrup meters normally sends per 8.
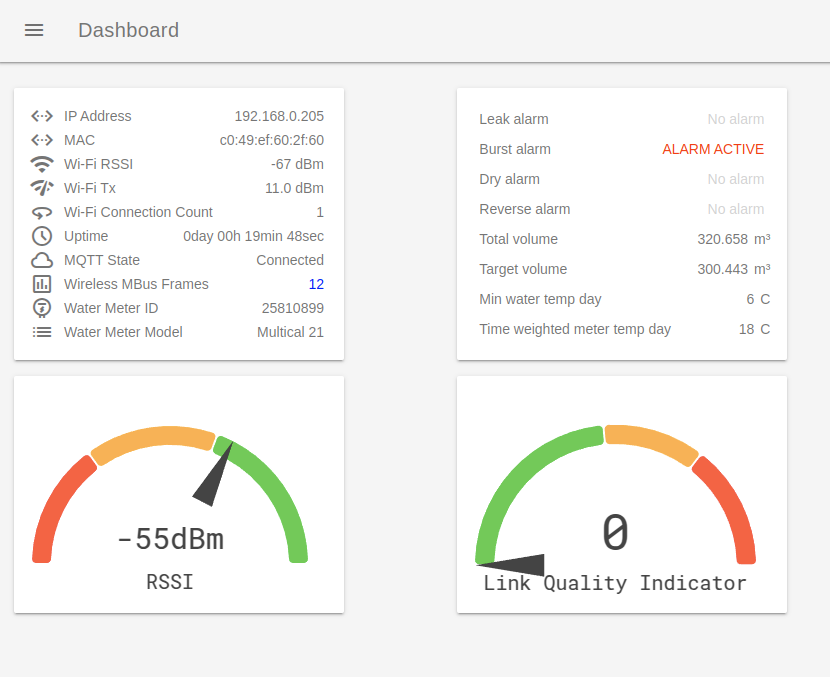
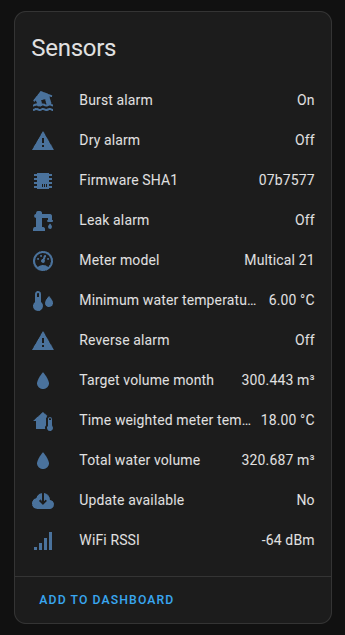
Measurement information
The watermeters comes with a range of different measurement points. However, not all are sent by your watermeter. The set of data that is sent over the wireless interface is configurable by the VA-provider. Which means, even if your meter have the ability to send one data point – the VA provider might not have activated it, and thus it is not transmitted.
This table show the sensors that the WiMBIB firmware currently supports.
| Measurement | Description | Home Assistent Sensor |
|---|---|---|
| Leak alarm | Leakage detected | wimbib_leak_alarm |
| Burst alarm | Pipe is bursting | wimbib_burst_alarm |
| Dry alarm | No water in the meter | wimbib_dry_alarm |
| Reverse alarm | Water is flowing in reverse direction | wimbib_reverse_alarm |
| Total water volume | Meter setting volume | wimbib_total_volume |
| Total water volume reverse | Meter setting, but reverse volume | wimbib_volume_reverse |
| Consumption last 24h | Volume consumed last 24 hours | wimbib_consumption_last_24h |
| Target volume year | Water volume consumed during last year | wimbib_target_volume_year |
| Target volume month | Water volume consumed during last month | wimbib_target_volume_month |
| Flow actual | Current water flow | wimbib_flow_actual |
| Max flow year | Highest water flow measured during last year | wimbib_max_flow_year |
| Max flow month | Highest water flow measured during last month | wimbib_max_flow_month |
| Max flow day | Highest water flow measured during last day | wimbib_max_flow_day |
| Min flow month | Lowest water flow measured during last month | wimbib_min_flow_month |
| Min flow day | Lowest water flow measured during last day | wimbib_min_flow_day |
| Volume weighted water temp day | Volume weighted water temperature during last day | wimbib_vol_weighted_water_temp_day |
| Time weighted meter temp day | Time weighted meter temperature during last day | wimbib_time_weighted_meter_temp_day |
| Volume weighted water temp month | Volume weighted water temperature during last month | wimbib_vol_weighted_water_temp_month |
| Min water temp day | Lowest measured water temperature during last day | wimbib_min_water_temp_day |
| Min water temp month | Lowest measured water temperature during last month | wimbib_min_water_temp_month |
| Min water temp year | Lowest measured water temperature during last year | wimbib_min_water_temp_year |
| Max water temp day | Highest measured water temperature during last day | wimbib_max_water_temp_day |
| Max water temp month | Highest measured water temperature during last month | wimbib_max_water_temp_month |
| Max water temp year | Highest measured water temperature during last year | wimbib_max_water_temp_year |
| Min meter temp day | Lowest measured meter temperature during last day | wimbib_min_meter_temp_day |
| Min meter temp month | Lowest measured meter temperature during last month | wimbib_min_meter_temp_month |
| Min meter temp year | Lowest measured meter temperature during last year | wimbib_min_meter_temp_year |
| Max meter temp month | Highest measured meter temperature during last month | wimbib_max_meter_temp_month |
| Max meter temp year | Highest measured meter temperature during last year | wimbib_max_meter_temp_year |
Alarms
When an alarm (if your meter supports it and WiMBIB have the manufacturers device fully supported) is triggered, the dashboard will have an red indication for the active alarm:
Also the corresponding alarm sensor in Home Assistant will have its value set to ‘On’:
FAQ & Troubleshooting
There is a facebook group at https://www.facebook.com/groups/remnetech.wimbib where you can find help and information about latest firmware upgrades.
LED Blinking Schema
| Blinking | Description |
|---|---|
| 5 fast blue | WiMBIB is booting |
| 2 slow blue | WIFI connected successfully to your access point |
| 2 slow red | WIFI failed to connect to your access point |
| 3 slow blue | MQTT connection successful |
| 3 slow red | MQTT connection failed |
| 1 slow blue | Radio frame successfully received and decoded |
| 1 slow red | Radio frame decoding failed (CRC) |
| 1 slow yellow | Compact frame successfully received, however, still waiting for full frame |
Reset the WiMBIB device
If your device for some reason needs to be reset to factory defaults and you’re not able to communicate with it – its possible to flash new firmware onto the device via the USB port.
- Connect the WiMBIB device to an computer via a USB cable (don’t use the one that came with your device, its only for power and is missing the data lines).
- On windows, you might need to install the USB-bridge chip drivers found at http://www.wch-ic.com/downloads/CH341SER_EXE.html
- Go to https://remne.github.io/wimbib/webflash/ , press the “connect”-button and select your port to the WiMBIB.
- Follow the instructions.
Read debug logs via ‘Remote debug log’-function
- Go the the WiMBIB settings -> Advanced Settings -> Remote debug log.
- Enable it. Set the IP field to the IP of your PC. Press ‘save & restart’.
- Make sure you have netcat (or similar) installed. For windows its ncat ( https://nmap.org/ncat/ ). In mac its ‘nc’ (download via brew). For Linux netcat.
- In a terminal window, run “netcat -ul 8888” (or nc/ncat depending on your OS).
- If you’ve done things correctly, the terminal will be populated with logs from your wimbib.
Read debug logs via USB
- Connect the WiMBIB device to an computer via a USB cable (don’t use the one that came with your device, its only for power and is missing the data lines).
- On windows, you might need to install the USB-bridge chip drivers found at http://www.wch-ic.com/downloads/CH341SER_EXE.html
- Open your favorite terminal program. Putty is recommended. https://the.earth.li/~sgtatham/putty/latest/w64/putty.exe
- Open the virtual serial port, use baudrate 115200.